
|
The Restoration
|
|
Contents: | ||||
|
1) Engine work 2) Carburettors 3) Fastners 4) Tinware 5) Frame and paintwork 6) Front forks 7) Polishing Aluminium parts |
|
|||
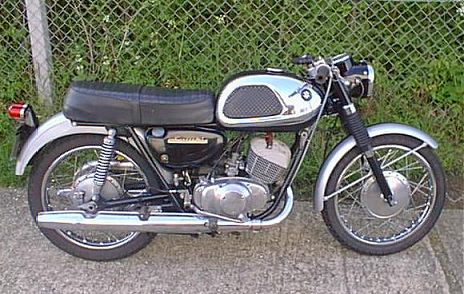
I started to strip both engines down in January 1999. My original bike came apart fairly easily, although getting the pistons out of the rusted up barrels took a lot of heat and 'persuasion'. When I split the crankcases it was time to examine the gearbox. I had taken it off the road because of a strange gearbox noise back in 1981. (Check out the
fun I had for the full story). As soon as I spun the gearbox round the source of this noise was clear, the dogs on fifth gear on the mainshaft were semi-engaging with fourth gear when the bike was in neutral. After many, many hours of stripping and studying the gearbox I finally discovered why this was. When I had rebuilt it in 1981, I had put the selector fork that moves the fifth gear the wrong way around. It fits in either way but the forks are offset from the pin by about 1mm. This meant that the two gears it moves were slightly too far to the right - hence the problem. It just goes to show that you should never rebuild something in a rush! I can't now fully remember why I stripped it down in 1981, but at least I have solved one problem, and I can't see any others.
1) Engine work
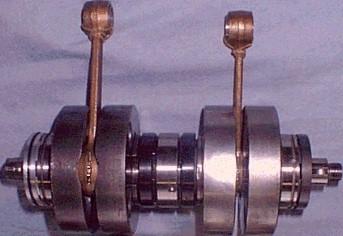
The crankshaft
|
As you can see the crankshaft was fairly corroded and all the seals and bearings needed replacing. There are many different companies that advertise crank rebuilding services, but some of them have never seen or heard of a Suzuki T20. It is always best to use a company that is familiar with the bike model that you want work to be done on. Look in the specialist press, or get recommendations from friends. I took the crankshaft to SEP engineering in Kegworth (Links page) who are familiar with T20 engines and have done work for me before. They did a superb job. The crankshaft was fully restored as you can see below. |

|
|
You can certainly see the difference between the two pictures! The left hand outer crank seal was not obtainable though so a special seal holder was made up to hold a smaller seal. The con-rods, big ends, little ends, crank pins, bearings, seals etc have all been replaced the flywheels lightly polished and the threads cleaned up. I was extremely pleased with the overall quality of SEP's work, and the price was very reasonable. |
| Other problems were a broken cooling fin on one barrel and the exhaust threads stripped on the other. The fin was easily welded up but the exhaust thread was a bigger problem. This is a major job, unless you happen to have a 'jig' for the job and have done loads before.....time to go back to SEP! At SEP they turned down the old thread, fitted a sleeve and welded it in place and then cut a new thread on to that. Very impressive. The picture shows the new thread. A little bit of filing and cleaning up is required and then it will be unnoticeable. |

|
The next job is to prepare the casings for the rebuild. I lightly filed off all burrs and knocks from the crankcase mating surfaces, and then went over them with a flat, well oiled, oilstone. This makes the surfaces perfectly flat and hence leak proof when you reassemble the engine. Another good tip is to always run a tap down all of the casing threads to clean them out - if any are damaged that you hadn't noticed before it is best to find out now rather than when you finally tighten them up! I used Jizer as a degreaser, followed by a high pressure garden hose, to degrease and clean the cases. After that its wire wool, polish and 'elbow grease' to get them how you want them. Don't over-polish them though. There is nothing worse than highly polished casings that look like nothing that ever came out of Japan!
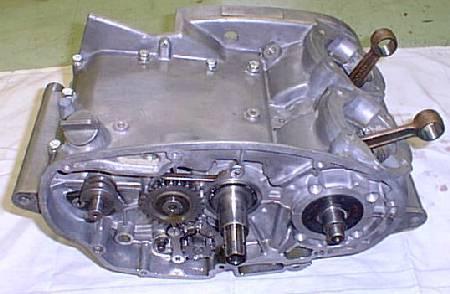
It looks good doesn't it.
The rest of the assembly was straightforward, as all of the parts had all been either replaced, repaired or otherwise worked on. However the carburettors were a different matter.....

| I always put off cleaning up the carb's till last. I hate this job as they are such an awkward shape to clean. They can also be tricky to dissemble without damage as they are made of such poor quality material - patience is the key. All of the air and petrol jets must be unblocked and properly cleaned out if the bike is ever to run properly again. I used degreaser, then a small wire bush followed by Solvol Autosol Aluminium polish rubbed on with a toothbrush, and finally buffed up with a cloth. Each carb took about a day! |
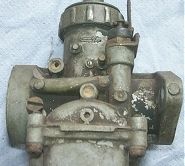 Twenty years of grime! |
| It wasn't just cleaning them up that was a problem though. When I went to assemble them I noticed that they were badly warped at the bottom where the float chamber fits on. Loosely assembling them without the gasket on showed that the four float bowl corners touched the carburettor bodies, but in the middle of the float bowl, there was a 2/3mm gap! |
| You can just see on the photo that the top of the float bowl is dead straight, but the corner of the carburettor is bent down! | Oh dear!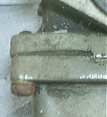 |
This was a setback to say the least. Any attempt to bend the carbs back into shape would have risked the corner breaking off - scrapping the carburettor. I tried to make thick, but tapered gaskets to account for the warp but the gaskets were just too fiddly and delicate for me to succeed. |
|
So now what! First I went back to plan A. I tried a bit of heat, a few smart taps, a bit more heat, but all to no avail - I couldn't staighten the corners. Also, the carb body has a delicate thin raised line all round where the gasket fits, to aid gasket sealing. If I damaged this it would be even harder to get a good seal. My spare set of carbs (the ones on the above photos) were slightly better, but still had the same problem. What next? Eventually it came to me - If I couldn't make the carbs fit the float bowls, why not make the float bowls fit the carbs? After a lot of filing, shaping, checking, more filing etc , I had beautifully crafted float bowls, each one shaped to exactly fit its matching and warped carb! I fitted them all together with the correct gaskets, and have had no leaks from them to date! |
 Filed and fitted! |
|
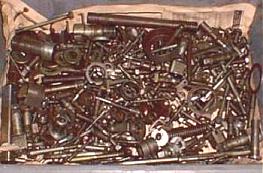
The nuts, bolts and other small parts needed a lot of work. It took me days to fully prepare them all. Rusty parts don't give a good finish so all of them need preparing beforehand. First stage is to degrease them all. Then I cleaned them all up using a 'Bench Grinder' - this has a grinding wheel on one side and a wire brush on the other. (An absolute essential for restoration work).
All of the bolts need to have the threads cleaned up with the wire brush and then, if necessary, the six sides and head touched up on the side of the grinding wheel. This is great fun! Your fingers get burnt and parts go flying across the workshop when you accidently let go. |
 |
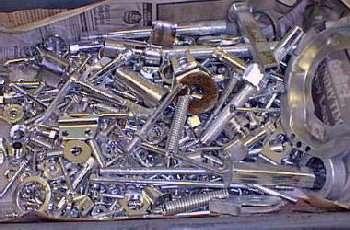 |
I finally finished them all (along with all the small brackets such as the steering damper parts, headlamp backing rim, swing arm end cups, brake cams, springs, steering lock cover etc.) and took them to Ashby's Plating Works (Links page) to be 'barrel' zinc plated. This is a very good process that does not involve all of the parts being wired up together - hence it is cheap. You pay by the load and Ashby's charge only �12-15 per load. You can see the difference if you compare this picture to the one above. |
As you can see it really does make your nuts and bolts like new. A lot cheaper than buying new parts. You can even chuck in parts like the friction damper - the plating doesn't touch the friction material. Make sure that you ask for a grey finish though as one type of Zinc finishing process makes them all yellow!
| The first stage is to examine all the parts carefully for splits, cracks and dents. There is no point in painting damaged parts. In my case numerous parts needed some serious attention, especially the mudguards. Despite having two sets of these I was hard pushed to choose the best set. Both front mudguards were dented and very splayed out out the ends. The rear mudguards were both severely corroded, particularly on the sides where they are double skinned, as you can clearly see on the photo. The one in the picture was the best of my two rear mudguards! It will take some work to restore these back to original condition. (The two screws you can see are only on the later T20s - they are for indicator fitment.) I decided to repair my worse condition, but earlier, set of mudguards as they were the ones originally fitted to my bike. |
Spot the rust?
|
| To make up the strengthening straps was again a very difficult job - particularly as there is a raised ridge running along the centre of each one. I roughed them out, but it was much harder than it looked. Graham had to take over from me and, as always, he made a superb job of it. It was then simply a matter of 'spot' welding them in place and covering them in undercoat. I had to use a bit of filler on the guards to smooth them off (not much though) and then it was a simple(?) job just to spray them the right colour. (Actually it wasn't a simple job at all - it was freezing cold when I did them and the paint kept reacting and bubbling up!). However, I'm sure that you will agree - the final finish is lovely. |
That's better!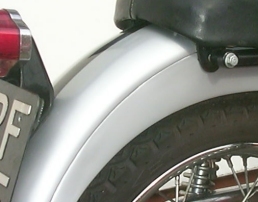
|
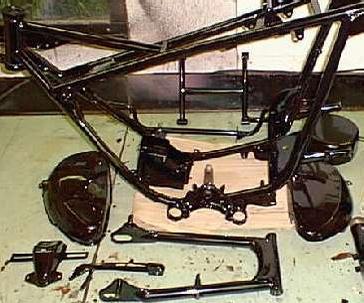
All of the frame parts and hangers have been degreased, straightened/repaired where necessary (see above), and then sent off to be Polyester Coated. This is far better than stove enameling or spray painting as the finish is very tough, won't chip, and looks good for years. It is like 'Epoxy' coating only with a better finish. I have sprayed the frame parts on other restorations and you can get a slightly better finish this way. However it just isn't as long lasting and anyway Suzuki were never exactly renowned for the finish on their early models! Be careful what company you use though as the variation in quality of finish between different companies is vast. Remember to ask for a gloss finish. I used Conqueror Industries in Royston (Links page) and can't fault them. They are a very impressive company who make even the smallest customer welcome.
5)Frame and painted parts
Check out the before and after pics below...
Wow! Thats better.
The petrol tank and mudguards I spray painted myself with cellulose paint. A lot of restorers now use 'Two-Pack' acrylic paint. This gives a much more durable finish and looks great. However you need specialist breathing equipment and a proper paint booth to use it, and I only have a garage and a face mask! Cellulose is much easier to use and gives great results though so it suits me fine. In either case, if you can give your painted parts several weeks to harden off before you use them you will find that the paint is much less prone to damage.
|
I had decided to polyester coat the front fork sliders as they are then very resistant to chipping with prolonged use. This is where the fun and games started. One fork slider had a very slight dent in it and so the fork stanchion would not come out as the bottom bush was to tight a fit to get past the dent. Despite every attempt I could not manage to do it. I tried heating the dent to bright red heat and then pulling out the stanchion. That didn't work. I tried brute force and heat together and again got nowhere. The only way I could see of splitting the fork leg now was to cut off the bottom and take the stanchion out that way! I would then have to ream out the remaining tube to the correct size and then weld the bottom back on. In the end a three minute job frustated me for several hours! Anybody out there got a spare fork leg? I had a pair of forks on my other T20 and used those instead but I still had to get this one repaired for use on that bike. Such fun. Eventually, with the stanchion in the vice, loads of heat and a big hammer, I did it. I've just got to repair the slider now.... The chromed oilseal holders did not want to unscrew either. There is nowhere to grip these in order to undo them without causing damage to the surface. The best way is to cut up an old inner tube and wrap it round them. You can then safely grip them, with grips such as 'stilsons', to undo them. As always, a little heat first helps. These then went for chrome plating along with all the other chromed front fork parts. The springs were quite corroded, and as my model has gaiters over them, a chromed surface is not needed. Ashby Plating recommended nickel plating and thats what I had done. The finished items look lovely. |
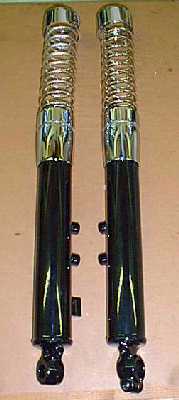
Excellent |
The fork stanchions themselves were quite badly corroded and needed to be replated. This is not a normal chrome plating job. They must first be straightened (nearly every old stanchion is a little bit bent), then ground down to remove old plating and reach good metal all around. They then must be 'hard chromed' and ground to size. A few specialist companies advertise this service and I used the very impressive A.M. Philpot (hard chrome) Ltd in Luton. (Links page) Unfortunately T20's have 'riveted on' bottom bushes that are prone to damage if you try and remove them. It costs a little more but you can leave these 'in situ' if you want and still have your stanchions ground. This is what I did and I was more than pleased with the results - they look absolutely brand new. Spot the difference...
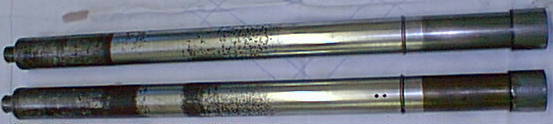
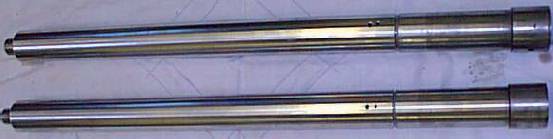
.....and after.
The after photo doesn't do them justice - digital cameras don't like shiny surfaces!
| This sounds expensive but isn't necessarily so. The mops and polish can all be bought from Cetem Polishing Supplies (Links page) for a fair price. They also sell an attachment so that you can drive them from a simple electric drill. This is OK for occasional use but it wears you drill out and you really need a more powerful motor. For the more advanced polishers out there you need to buy a motor. The cheapest way is to buy an old washing machine or spin drier motor for next to nothing from the scrapman. I was extremely fortunate in that my very good friend Martin Wardle built, and then gave to me the polishing motor shown here. This saved me a lot of time and effort. Ask him for advice on how to build yourself one. |

Hi-Tech equipment! |